The PurePhoto Blog

Client spotlight: Ariel Fox Design | Nicole Fahey
Client Spotlight: Ariel Fox Design | Nicole Fahey Ariel Fox Design has partnered on projects for a coveted group of renowned developers and property groups, including Alliance, Dinerstein Companies, Greystar,...
Client spotlight: Ariel Fox Design | Nicole Fahey
Client Spotlight: Ariel Fox Design | Nicole Fahey Ariel Fox Design has partnered on projects for a coveted group of renowned developers and property groups, including Alliance, Dinerstein Companies, Greystar,...

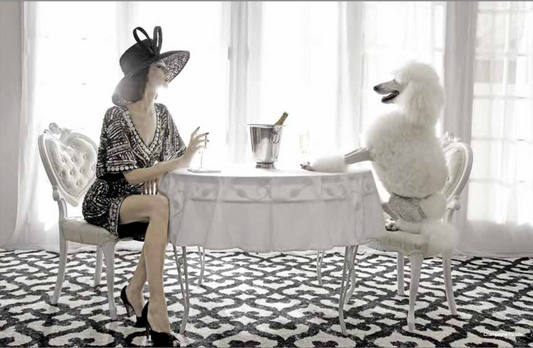
Javiera Estrada | "In the Bedroom"
Javiera Estrada: a multi-media artist born in Acapulco, Mexico in 1981, and later immigrating to the United States in 1989, showcases a diverse body of work spanning photography, mixed media,...
Javiera Estrada | "In the Bedroom"
Javiera Estrada: a multi-media artist born in Acapulco, Mexico in 1981, and later immigrating to the United States in 1989, showcases a diverse body of work spanning photography, mixed media,...

Aerial Shooters 2
PurePhoto is home to some of the world's most audacious photographers, a collective of individuals who redefine the limits of creativity and courage. These world-class aerial artists defy gravity...
Aerial Shooters 2
PurePhoto is home to some of the world's most audacious photographers, a collective of individuals who redefine the limits of creativity and courage. These world-class aerial artists defy gravity...

Aerial Shooters 1
PurePhoto is home to some of the world's most audacious photographers, a collective of individuals who redefine the limits of creativity and courage. These world-class aerial artists defy gravity...
Aerial Shooters 1
PurePhoto is home to some of the world's most audacious photographers, a collective of individuals who redefine the limits of creativity and courage. These world-class aerial artists defy gravity...

New Art Drop: Peter Andrew
PurePhoto is excited to announce a quiver of amazing new art and artists over the next few months. Follow us on Instagram so you don’t miss them. We’ve already posted...
New Art Drop: Peter Andrew
PurePhoto is excited to announce a quiver of amazing new art and artists over the next few months. Follow us on Instagram so you don’t miss them. We’ve already posted...
Favorite of the Trade
Large Format Prints: Pioneers in the realm of grand-scale fine art photographs for more than 15 years, PurePhoto continues to lead. Our expertise transforms spaces with images that demand...
Favorite of the Trade
Large Format Prints: Pioneers in the realm of grand-scale fine art photographs for more than 15 years, PurePhoto continues to lead. Our expertise transforms spaces with images that demand...